Optimizing Images for SEO: A Guide for Graphic Designers (and anyone who has a website!)

Alex Melen
Co-Founder

As a graphic designer, you produce the most eye-catching graphics for your client’s projects. But you need to ensure you are also the expert in giving your clients the proper file format for the job.
In the digital age, a website’s success isn’t solely determined by engaging content and design—it’s also about how you, as a graphic designer, optimize every element, including images, for search engines. Graphic designers play a pivotal role in ensuring that images are not just aesthetically pleasing but also contribute to a website’s SEO.
In this guide, we’ll explore the importance of image optimization for SEO and provide tips and best practices for creating SEO-friendly images, including file formats, compression, and alt text, while highlighting how optimized images can improve page load times and user experience.
Importance of Image Optimization for SEO
Images are a fundamental part of web content, enhancing user engagement and conveying information. However, they can be a double-edged sword when it comes to SEO. On one hand, they enhance the user experience. On the other hand, if images are not correctly optimized, they can slow down page load times, negatively affecting both SEO and user satisfaction.
Tips and Best Practices for Creating SEO-Friendly Images
Choose the Right File Format:
When selecting a file format for your images, consider the purpose. Use JPEG for photographs and images with many colors, as it provides a good balance between quality and file size. For images with transparency, like logos, use PNG. For simple graphics and icons, opt for SVG (Scalable Vector Graphics).
Let’s look at each of the formats.
JPEG (.jpg, .jpeg)
JPEG, which stands for Joint Photographic Experts Group, is a “lossy” format. This means images are compressed to make a smaller file size by losing quality, but you generally can’t see the difference. JPEG files will compress extra data that is not generally noticeable.
Cons:
JPEG files use lossy compression, which means some file information is lost. If you compress the file too much, this is when you can see fuzziness, also called pixelation.
Best For: web images and pictures from a camera
Note: There is no transparency with JPG images
GIF (.gif)
GIF, or Graphics Interchange Format, is what is known as “lossless” compression. Images can be compressed without losing any file information, generally speaking. (There are exceptions depending on the source image if you convert to GIF and depending on the encoding). GIF does support transparency and can be animated.
Cons:
GIF is limited to 256 colors.
Best For: web icons, due to a lack of color
PNG (.png)
PNG, or Portable Network Graphics, is a great format and lossless – so it can be compressed without losing quality. The trade-off is that file sizes could be larger because it doesn’t lose any information upon compression. Another advantage is that is handles 16 million colors and transparency.
Cons:
File sizes can be larger.
Best For: complex images (i.e., photos, etc.) that need transparency
WEBP (.webp)
WEBP is a newer file format pioneered by Google. It is an open-source format that offers higher-quality images but smaller file sizes. It tends to have better compression than .jpg files, about 25% better, and it also handles transparency and animation. WEBP is the only image type to support transparent images with both lossy and lossless compression (this is decided in the software you use when you save the file).
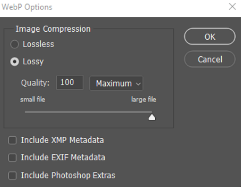
As you can see, you can choose either lossless or lossy compression, as well as choose how much compression you would like to apply.
Cons:
It’s a newer file type, so older versions of graphics software may not support it.
Best For: everything – and the file size will generally be smaller than other compression methods.
Compression is Key
Large image files can significantly impact page load times. To avoid this, compress images while maintaining acceptable quality. Numerous online tools and graphic design software have features for image compression. Strive to keep file sizes as small as possible without sacrificing image clarity.
Descriptive Alt Text
Every image should have a clear and concise alt text. Alt text is added when an image is coded into a website. If you use website software, there will be an option to add alt text. Adding alt text to images makes the web accessible to everyone, including the visually impaired. It helps screen readers to identity the image and provide a verbal description to the users who cannot see it. This also ensures your website is ADA compliant and more user friendly for people with disabilities.
Alt text not only improves accessibility but also provides an opportunity for SEO. Describe the image in a way that includes relevant keywords but remains natural and informative. Avoid keyword stuffing into alt text, as it is detrimental to SEO.
Image Filenames
Give your image files meaningful names that reflect the image’s content. Use hyphens to separate words (e.g., “red-rose.jpg” instead of “image001.jpg”). This can help search engines understand what the image is about. You want to use your keywords at every natural opportunity you can and clearly identifying your images is a good chance. Plus, this is part of best practices when designing a website.
Image Dimensions
Scale your images to the exact dimensions needed on your website. Large images that are displayed as smaller versions can be a significant contributor to slow page load times. Even if your image only displays as a tiny image, the web browser is still loading the large image, but displaying it smaller. It will help your site in the long run to have all your images the right size, rather than relying on code to shrink them to be displayed on a page.
Responsive Design
Create images with responsiveness in mind. Different devices have various display sizes, and optimizing images for responsive design ensures they adapt well to different screen sizes, enhancing user experience. Talk to your coders – you can display different images depending on mobile than on desktop devices. You can resize your images for mobile, giving you an advantage over websites who just scale down desktop images for mobile. You will have a page load speed advantage with properly sized images for mobile devices.
Improving Page Load Times and User Experience
Optimized images play a crucial role in improving page load times and overall user experience. Slow-loading websites can lead to higher bounce rates and decreased SEO rankings. When images are optimized, they load faster, making your website more user-friendly. Faster websites tend to rank higher in search results, as page speed is a ranking factor considered by search engines like Google. Users appreciate websites that load quickly and smoothly, which can increase engagement and conversions.
SmartSite’s Conclusion
As a graphic designer, your role extends beyond the aesthetic appeal of images. It encompasses their performance and contribution to SEO. By following these image optimization tips and best practices, you can enhance both the visual appeal and SEO performance of your designs, ultimately contributing to the overall success of the websites you work on. Remember, a well-optimized image isn’t just beautiful; it’s a powerful asset for SEO and user satisfaction.
 Free
Consultation
Free
Consultation Free
Google Ads Audit
Free
Google Ads Audit